BeagleBone Black UARTs
Unlike the BeagleBone White, the BeagleBone Black has no built-in serial to USB connection. This was one of the several cost saving measures taken in order to get the per-unit price down to $45 USD. The serial debug interface available at J1 is setup to allow the use of an FTDI TTL-232R-3V3 3.3V serial to USB adapter (Figure 1). An FTDI 3.3V knock-off is available from Amazon, and works well for this application. The unit cost is $19 with free Prime shipping. Using the UARTs from another BeagleBone Black would have served the same purpose for only ~$20 more (Figure 2). Also note that, depending on the use case, the BeagleBone Black can also monitor its own serial debug port via one of the other UART ports.
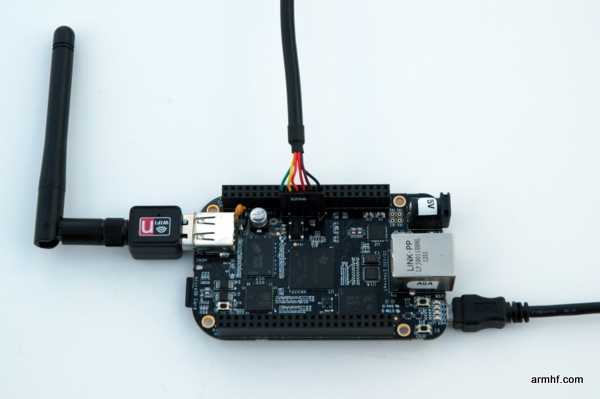
Figure 1 – BeagleBone Black with an FTDI TTL-232R-3V3 3.3V serial to USB attached to J1
Device Tree Overlay
The BeagleBone Black am335x-boneblack.dtb device file has only /dev/ttyO0 active by default. To enable the other UARTs, we could either modify this file or create an overlay (.dtbo) file to adjust this behavior at runtime. I opted to go with the .dtbo overlay approach. The compiled files and their proper application are noted in the section below.
Figure 2 shows the connection between the board doing the monitoring (top) using UART4, RX pin P9-11 and TX pin P9-13. It is connected to the board being monitored (bottom) via its UART0 serial debug port at J1. Note that J1 has six pins, but only three are active: pin 1: ground, RX pin 4 and TX pin 5. In this case the TX is tied to RX and vice-versa (TX:P9-13 to RX:J1-4 and RX:P9-11 to TX:J1-5).
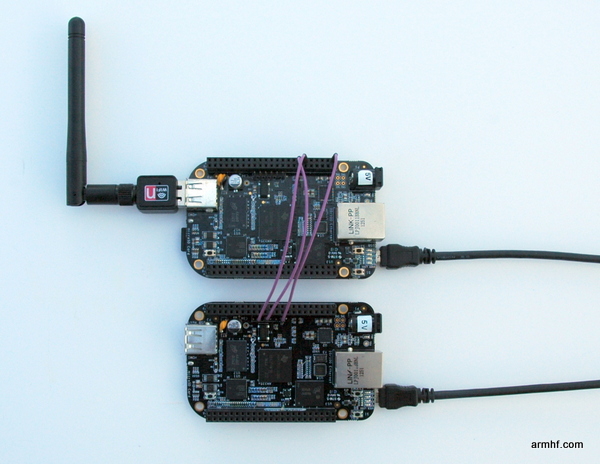
Figure 2 – BeagleBone Black serial J1 attached to BeagleBone Black ttyO4
Install and start minicom (apt-get install minicom) and launch it in setup mode (minicom -s). Select Serial port setup and change the Serial Device to /dev/ttyO4 (or whatever port you are using). Note that Hardware Flow Control is on by default and should be turned off.
That’s it. You should now be seeing the login screen of the other BeagleBone Black:
Welcome to minicom 2.5

OPTIONS: I18n
Compiled on Dec  7 2011, 12:04:29.
Port /dev/ttyO4

Press CTRL-A Z for help on special keys

Ubuntu 12.04.2 LTS ubuntu-armhf ttyO0

ubuntu-armhf login:
Serial UART Device Tree Overlay Files
The most difficult part was figuring out how to build the device tree overlay files. To build the overlay, use the unmodified device tree compiler available in the Ubuntu packages (apt-get install device-tree-compiler). Googling around, many examples are Ångström based that use /plugin/ and had a command-line option -@ that Ubuntu stock device tree compiler does support. By decompiling an existing overlay file it is not too difficult to see how the parameters are defined within the file. Below are overlay files for the various serial ports of the BeagleBone Black.
Copy the following .dtbo overlay files to the /lib/firmware directory and apply them after each boot with the command: echo ttyO1_armhf.com > /sys/devices/bone_capemgr*/slots
- ttyO1_armhf.com-00A0.dtbo
- ttyO2_armhf.com-00A0.dtbo
- ttyO4_armhf.com-00A0.dtbo
- ttyO5_armhf.com-00A0.dtbo
Note 1: ttyO3 does not have an RX pinout (it is tied to the TDA19988 HDMI chip)
Note 2: ttyO5 shares pins with the HDMI overlay – both cannot be active at the same time
Note 3: ttyO0 is available on J1 and does not require an overlay
After applying all four of the .dtbo files, you should see something like:
root@ubuntu-armhf:/# ll /dev/ttyO*
crw-rw---- 1 root tty     249, 0 Jan  1  2000 /dev/ttyO0
crw-rw---- 1 root dialout 249, 1 Jun 17 18:16 /dev/ttyO1
crw-rw---- 1 root dialout 249, 2 Jun 17 18:16 /dev/ttyO2
crw-rw---- 1 root dialout 249, 4 Jun 17 18:16 /dev/ttyO4
crw-rw---- 1 root dialout 249, 5 Jun 17 18:16 /dev/ttyO5
root@ubuntu-armhf:/#
Serial UART Address and Configuration
Below are the notes from cross-referencing the BeagleBone Black System Reference Manual, the TI AM335x Datasheet, and the TI AM335x Technical Reference Manual. Take some time to review these manuals for yourself – several websites are out there with inaccurate information and transcription errors, so it pays to double-check. It is always more frustrating and challenging when multiple issues exist in code; this is one easy thing to get right. Also, don’t forget to examine the kernel log dmesg after trying to load an overlay file – many times the kernel will tell you exactly what is wrong.
UART0: 0x44E0_9000 (/dev/ttyO0)
   TX: 0x174 0x00 (j1-p5)  (ZCZ-E16 UART0_TXD mode:0 [datasheet]) = (conf_uart0_txd 974h [TRM p1126] = 0x0174)
   RX: 0x170 0x20 (j1-p4)  (ZCZ-E15 UART0_RXD mode:0 [datasheet]) = (conf_uart0_rxd 970h [TRM p1126] = 0x0170)

UART1: 0x4802_2000 (/dev/ttyO1)
   TX: 0x184 0x00  (p9-24) (ZCZ-D15 UART1_TXD mode:0 [datasheet]) = (conf_uart1_txd 984h [TRM p1126] = 0x0184)
   RX: 0x180 0x20  (p9-26) (ZCZ-D16 UART1_RXD mode:0 [datasheet]) = (conf_uart1_rxd 980h [TRM p1126] = 0x0180)

UART2: 0x4802_4000 (/dev/ttyO2)
   TX: 0x154 0x01  (p9-21) (ZCZ-B17 SPI0_D0   mode:1 [datasheet]) = (conf_spi0_d0   954h [TRM p1126] = 0x0154)
   RX: 0x150 0x21  (p9-22) (ZCZ-A17 SPI0_SCLK mode:1 [datasheet]) = (conf_spi0_sclk 950h [TRM p1126] = 0x0150)

UART3: 0x481A_6000 (/dev/ttyO3)
   TX: 0x164 0x01  (p9-42)       (ZCZ-C18 ECAP0_IN_PWM0_OUT mode:1 [datasheet]) = (conf_ecap0_in_pwm0_out 964h [TRM p1126] = 0x0164)
   RX: 0x188 0x21  (no breakout) (ZCZ-C17 I2C0_SDA          mode:1 [datasheet]) = (conf_i2c0_sda          988h [TRM p1126] = 0x0188) I2C0_SDA is tied to TDA19988

UART4: 0x481A_8000 (/dev/ttyO4)
   TX: 0x074 0x06  (p9-13) (ZCZ-U17 GPMC_WPn   mode:6 [datasheet]) = (conf_gpmc_wpn   874h [TRM p1124] = 0x0074)
   RX: 0x070 0x26  (p9-11) (ZCZ-T17 GPMC_WAIT0 mode:6 [datasheet]) = (conf_gpmc_wait0 870h [TRM p1124] = 0x0070)

UART5: 0x481A_A000 (/dev/ttyO5)
   TX: 0x0C0 0x04  (p8-37) (ZCZ-U1 LCD_DATA8 mode:4 [datasheet]) = (conf_lcd_data8 8C0h [TRM p1125] = 0x00C0)
   RX: 0x0C4 0x24  (p8-38) (ZCZ-U2 LCD_DATA9 mode:4 [datasheet]) = (conf_lcd_data9 8C4h [TRM p1125] = 0x00C4)